How NOT to Build a Sandbox
This weekend, I helped my Dad and Brother-in-Law Jack build a sandbox for my little nephew Andrew. My sister had found plans online at Lowes. I picked up the guys around 10AM Saturday and we headed for Lowes. While on the way, I asked my Dad to read off the list of stuff we were going to need, so I could start to put a plan together in my head both for shopping and construction.
This wasn’t even step #1, and things were already going sideways….
Here’s a link to the “plan” (you’ll see why I have this in quotes as you read along), so you can follow if you are interested: The “Plan”
My Dad is reading the list of items verbatim, and things are not stacking up. I saw the picture on the top of the plan when we were at a stop sign. The stuff he’s reading and the photo are not matching. At all. The photo clearly shows two-by material, but the plans are calling for one-by. The photo shows single boards, but the plans are calling for joining boards to make the sides. The plans are calling for 1-1/4″ screws and apparently only ONE 3″ screw. The tools needed call for a hammer, but no screwdriver. Clearly, there were some issues with this “plan.”
When we get to the store I take a look at the plans myself. What they are describing and the photo they included are wildly different. In fact, the construction diagrams show something yet different from the photo AND from what the plans are telling the builder to do. This is going to be an adventure.
Fortunately, building outdoor boxes that don’t have to be permanent is not rocket science. After reviewing the plans and talking about them with Jack and my Dad, we come up with a new plan that will actually work, based on the “plan” text, and incorporating some features my sister wanted (such as seating, which was shown in the photo but not included anywhere in the “plan”).
We got some tools that Jack would need to round-out the construction needs for this project and some other house projects, some cedar boards of questionable quality and merit, ground cover, screws, and glue. Not having my truck available right now due to a possible head gasket issue (a story for another day.. ugh), we loaded everything onto and into Newbaru and headed back to Jack’s for construction.
Several hours later, we had a pretty snazzy looking 8′ x 8′ x 1′ sandbox (thanks Marissa for the photo! I forgot to take one!):
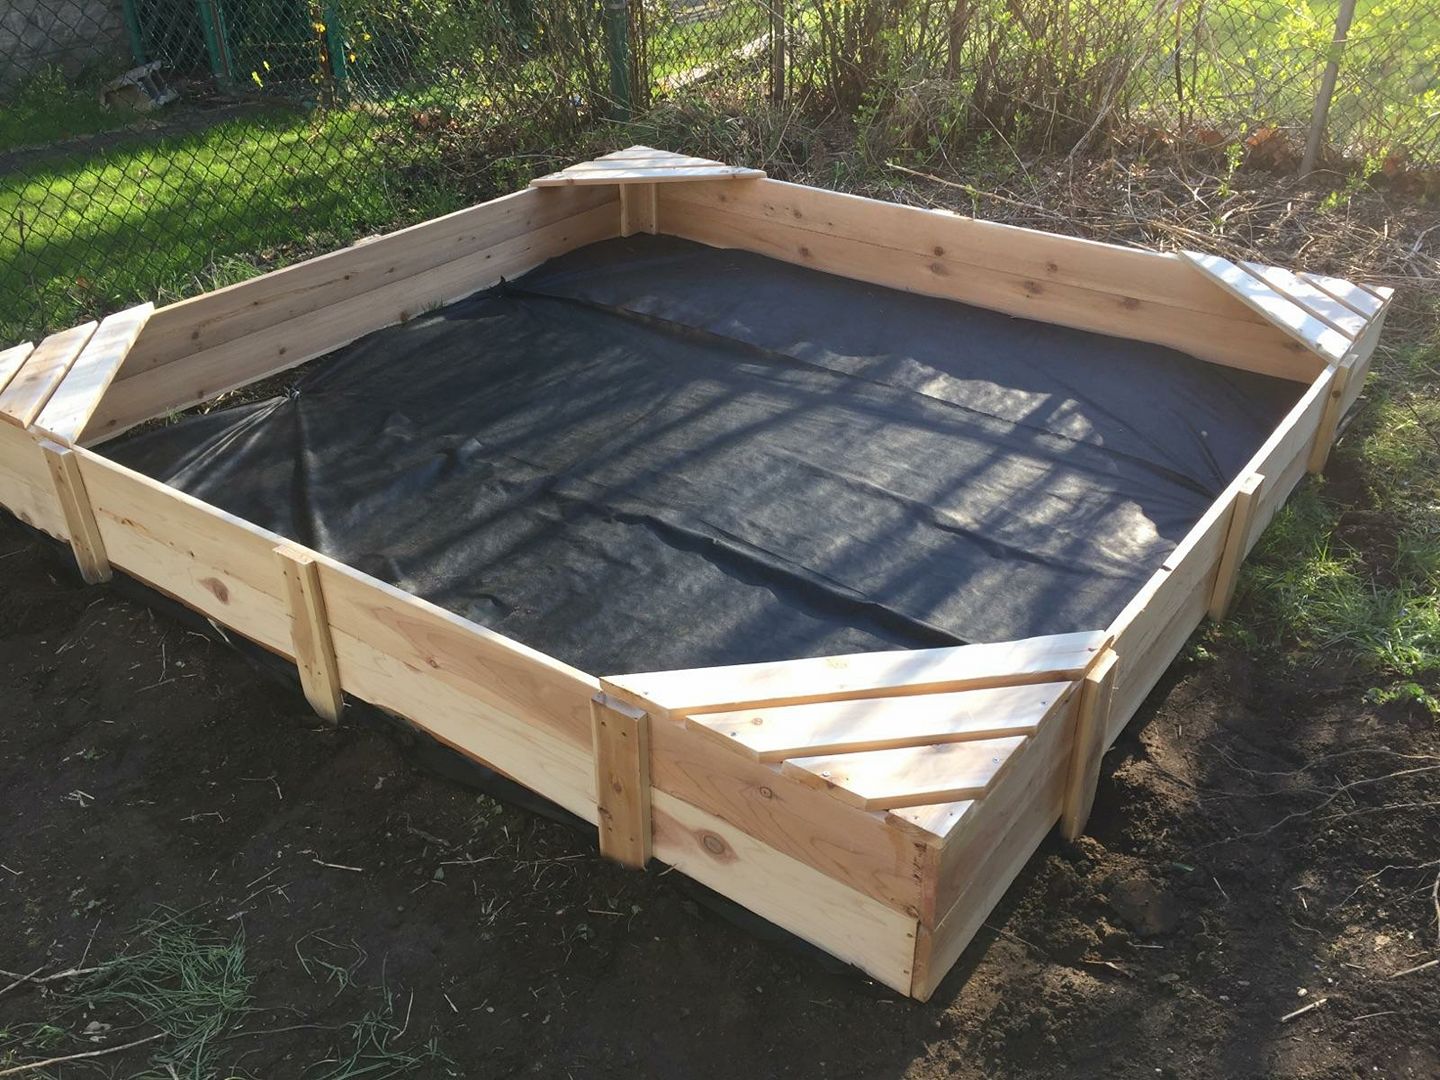
Rule #1 when using someone else’s plans for something: Read the plans before starting construction. If we had just bought stuff and jumped in, there would have been much sadness (and at least one extra trip to the store for material that was not included on the “plan”).
For those of you interested, here’s what we did differently than the “plan”:
- We left all the sides at 8′ long. The slightly rectangular box that results from having two sides a couple inches longer than the other two doesn’t matter in the end at this scale.
- The inside corner braces don’t look like they do in the photos. 10″ is shorter than 12″, so they’re obviously not going to protrude from the top of the box sides. That diagram is ridiculous. We cut them at 10″ and aligned them with the base of the sides. Functionally, they could have been made as long as the two joined 1×6’s are wide, but the plans probably just said “10 inches” to avoid the problem of 1×6’s that aren’t really 6″ wide.
- Again with the corner braces… We made two “long” sides that had the corner braces flush with the ends of the boards. For the two “short” sides, we offset the braces by the width of two boards from the ends (full disclosure: We actually only offset by one board width in the beginning, then realized the error and had to fix it, since we have to accomodate both the width of the side and the width of the brace on the long board). This left a nice “rabbet” on the short boards to capture the long boards and their attached corner braces.
- The plans called for 20″ stakes that were driven into the ground after the box was placed. We decided to go with 16″ stakes instead to keep the board sides in line. 20″ seemed pretty excessive and also hard to manage. (and difficult to drive in soil around trees).
- Both glue and construction adhesive take time to cure. Construction can be sped up by clamping the glued boards, then attaching both the stakes to the outside and the corner braces to the inside. After doing that, the boards are clamped by virtue of being held together by the stakes and braces, so the clamps can be removed and used for the next side.
- The plans don’t mention pre-drilling for the screws. One can usually get away with not pre-drilling pine for weatherproof screws. Not so for (crappy quality) cedar, which is generally super-dry and prone to splitting. We tried one without pre-drilling and had to abandon that idea right away. All screw holes were pre-drilled for the rest of the project.
- We used an outdoor-safe wood glue that I’ve used on many furniture projects. I was more comfortable with that than construction adhesive. I know its properties well.
- Boy, I wish I had a jointer or table saw with a jointing jig there when we were doing this. I picked the straightest boards to be found at the big box construction store, but the quality was pretty low, and getting the edges to come together required some finesse.
- We added corner seats with triangles and then three boards cut with 45º ends. This will help to hold the sides together as well as help to keep the box square.
- We dug out the spots where the stakes set into the ground, and Jack is going to back-fill with some soil. We tried to drive them into the ground and were mildly successful, but they needed some extra help to get the box flush to the ground.
- We did not excavate for the box. I suppose we could have, but the ground was mostly clean already because there had been a couple of raised bed garden planters there. We leveled the site pretty well, placed the ground cover, and then placed the completed box on top.
- The stakes and corner braces were assembled using 1-1/4″ screws. We used 3″ screws to secure the sides together. We found we had to be extra careful with screws in the seat boards, even with pre-drilling them, a few started to split when driving in the screws (we used 1-1/4″ screws here, too).
In the end, we had a nice sandbox (sans sand, which they are arranging this week). It was a fun adventure. We got to play with power tools. It was a good Saturday. 🙂
You May Also Like

“Removing Myself from the Narrative”
A Modern “Writing” Desk